After modifying the program, I try to run the program in iMac in studio and iMac pro respectively. They run much better and much faster than before. Even I run the program in the studio computer, it won’t crush and I can get a better image as well. However, it still a bit lag in the studio computer. So, I think I will go for the iMac pro.
Category / Experiment
Program test 2
In order to tackle the problem yesterday (resolution vs speed), I opened 2 open cv to solve the problem. One with lower resolution to speed up the time for detecting faces while another one with higher resolution for output and blur. So I can have a better and faster output.
Moreover, I set up a counter for the face detection before to buffer face detection (so it doesn’t need to be run for every frame) in hoping of reduce computing and make the program run faster. However, sometimes our distance towards the camera changed so fast which the buffer obstructed the analysis and also for applying the effect. It was another reason why it looked a rather significant delay when we change our distance closer to the camera in the last demo video. Therefore, I removed the counter to smoother the blur.

After these improvements, I am so happy that the program can even run in my laptop relatively smooth in my laptop now. I will run the patch to iMac pro/iMac again to see how the program looks like to run on a larger screen and more powerful computer after the bank holiday.
Program Test
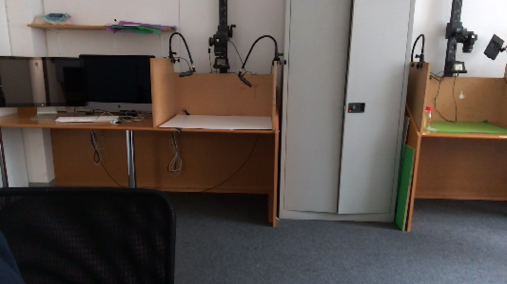
Last time I tested my patch from Processing in my computer and IMac respectively. (Mirror can’t see myself: bigger screen 2 )To run the program in full-screen mode, I had to lower the display resolution and there was some delay for both situation. Because the program runs a real-time camera. The image needs to be updated frame by frame. Moreover, the algorithm for face detection is rather computationally intensive as the computer needs analysis if there is a face in every frame and also do the blur effect. It has to calculate pixel by pixel. So it causes lots of work for the computer. Therefore, if I lowered the display resolution, the pixel needed to be analysed in full-screen mode will be lesser than full resolution and I can run the program in full screen. But the program has to be smoother in full-screen mode, it is better to run the program in a more powerful computer.
So today, I go to digital media to test the program again on iMac Pro. However, it still lags. So, I modify the code again to see if it can run faster:
1.) I found that I was applying the blur effect to the whole program, no matter what size of the video is. Therefore, I changed it into applying on the image shown only.

2.) I lowered the output resolution as well to make the program run faster. As it is the key reason why it processed so slow. The program does run much faster. However, the image resolution will be sacrificed at the same time. It is quite significant when there is no face detected (i.e no blur effect).

Although the program runs faster than before, the resolution is sacrificed. I see some hope from the progress. I believe I can come up with some ways to make it run faster. What I need to do is strike a balance on the speed and the resolution. At the same time, I will look at how to speed up the time for blur effect and face detection. So, I will keep playing around with the code this weekend!
Buddha Buddha Buddha
trial
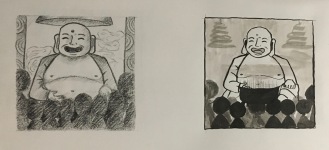
At first, I follow the style I drafted to draw the Smiling Buddha in the story and it is based on the look of Bedai. However, when I started to drew by ink or coloured pencil, I feel strange as it doesn’t look like a sculpture inside a temple. lol Then, I researched again and I figure out the reason – most of the huge Bedai sculpture (i.e Smiling Buddha) places outdoor. At the same, I look at more buddha sculptures and ancient masks to get inspiration and draft again.


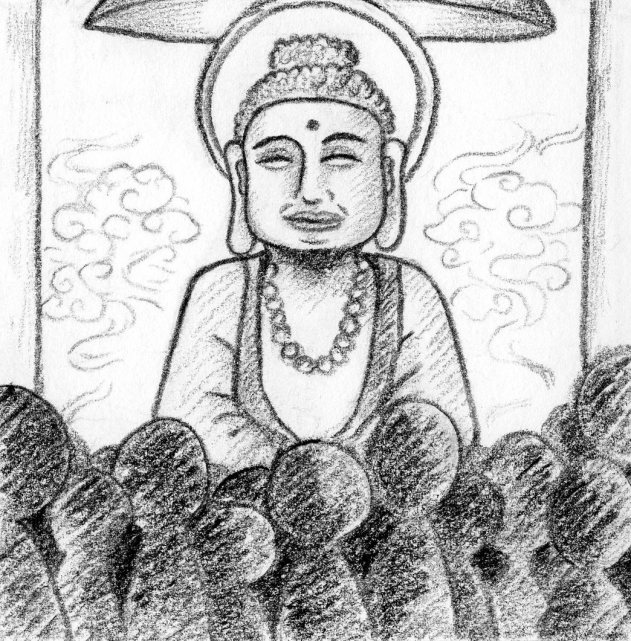
Although the setting of the story is based on reality, I don’t want people misunderstanding I am talking about the real Smiling Buddha and questioning its existence which is not the main point of the story. Therefore, I decide not to use the exact Bedai image as the Smiling Buddha in the story. And this is the new version and the first illustration for the story.
Character Draft for the story
The Shaman

The host

Smiling Buddha

Smiling videos – clips combination 1 & Experiment
I edited and combined the footage I have to see how it looks. I faced different choices for filming and editing.
Portrait/landscape?
For shooting, I keep the format as portrait and hold the phone by my hand just like taking a selfie. Compared with the trials, I think portrait format works better than landscape format. As the audience can more easy to focus on the facial expression and less likely to be distracted by the background.


Speed?
The duration of videos I smile varies from less than a minute
e to up to more than 3 minutes. Therefore, I speeded up each clip to around 30 sec. The changes of the smile and the whole process will be more significant and more easy to watch. However, the clip is slowed down steady to nearly normal speed towards the end in order to emphasise the difference and show how I could not hold the smile anymore clearly. As normally these moments only last for a second. When I couldn’t hold the smile anymore, it will start another video straight away.
Editing
I have tried different way to edit the footage after I speeded up all them. I cut the footage into different pieces and group them together. For example, the video will be jumped to another footage in the middle or I group all the moments I can’t hold at the end. However, the change of the smile becomes unclear. Therefore, I put them one by one in random.
Result
Now the video has 7:25 in total and I find the result is good. It just like I am so tired to hold the smile but I have to start smiling again in next second. The video works better with more clips and also more scenario. Although the process is hard, I start to like this work when they combined together.
Today, I showed Jonathan the combined video. He suggests me to keep going and take more footages. I can choose some places with more people at the background because it is more clear and significant to see the video is speeding up. I agree that with more scenario the video can become more comprehensive. Moreover, I can play around with old technology and different editing effect such as vignette.
Therefore, I will start shooting smiling video again after resting for a few days (don’t want to/ can’t smile after last weekend). I think I also need to strike a balance on how many videos I take per day in order to keep its sustainability. Otherwise, I am afraid I won’t able to smile anymore after the project…
Smiling videos – 1st clip
In the pop-up show, everyone participated in had to make a 30-second video. At that time, I prepared a video about I was smiling until I couldn’t hold the smile anymore. I speeded it up to 30 second afterwards so the change will be more clear. At first, I was testing for how long can I smile and how I looked when I was holding a smile for a long time. My face was already sooooooooo tired after a few attempts and the muscle in my face was keep shaking. The time I could hold became shorter and shorter after each attempt. After shooting the videos, I didn’t want to and couldn’t smile anymore in that day.
However, I found the outcome is interesting. At the same time, I struggled whether I should submit it. Because I think the video is too stupid and too simple. Therefore, I asked people for some opinions and feedback. But what out my expectation were they like the video. They see something else from the video which I didn’t notice before and connected with their own experience. However, I still didn’t take my courage to submit it at last.
Their feedback:
- will curious how long will I smile and
- what will happen next
- their faces also feel tired (just like she was smiling for a long time as well/ she is following to smile unconsciously)
- the more you force yourself to smile (be happy), the more upset you become (faker smile you will have)
- the same feeling of how she feels when she starts to step into society to work (the frustration of wearing a “mask” and smile to everyone)
- simple but the message is clear
- try to take more with different background
First VR experience

My trial
After doing the animation, Happy Cycle #5. I decided to change its form and try to make it as a VR piece. Therefore, I have found some ways to make a VR. And today, I try to use Unity. Although I just tried with some basic shape for testing, it works quite well and more easy than I thought (at this stage). So, I will try to build the model and put it in Unity to see what can I do with it in the following days.

Happy Cycle #5
Face – Material Test
Last week was a challenging week. My mould is ready and I can play with different translucent materials to make the sculpture now! And so here is what I have done last week:
I tried to use silicone to make the first layer and then put another facial expression, which made by 3D-print, inside as the inner layer to make the sculpture. I found that the silicone layer was too thick that it is not transparent enough to see there was something inside this layer. Besides, there were many bubbles insides. I tried to put some light at the front and also the back, the effect was not satisfied.


After learning from mistakes, I tried to use silicone again. But this time, I printed a larger face for the inner layer to the outer layer can be thinner and more transparent. Moreover, I mixed the silicone as gentle as I can in order to reduce the number of bubbles. The outcome was better than the previous one. Although it still has some bubbles inside, it is much less than before when compared. I can see there was something inside without the spotlight. However, as the inner layer is larger than before, the light was hard to pass through silicone. It is still not the effect I would like.
 Therefore, I tested to make my face sculpture with wax and see if the result will be better. The result of wax was quite good (no bubbles!) except it was not transparent. I can barely to see there is a face inside. In the coming week, I will keep on trying different materials, such as glass wax and epoxy resin. Although I still not get the best effect yet, I am glad that I am getting closer to what I want by keep testing and learning from mistakes. In addition, the process of making a sculpture is completely new to me. I really enjoyed I can keep learning, especially learning a new technique from making a new project. So, The coming week will be another challenging week but I look forward to it to test other materials. Hope that I can make it before the show!

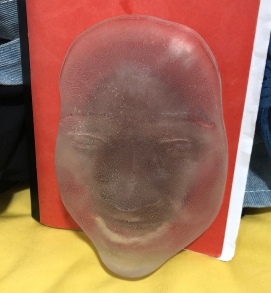
Face after many experiments
After experimenting in different material to make the outer layer, my home is full of faces (around 10) lol. I finally succeed in making the effect I want by using glass wax. It is a challenging material as it took few hours to melt. I also had to pay attention to the temperature control. If the temperature is too high, the wax will become yellowish. Moreover, it will cool down in a very short time. If it starts to cool down, it will become very sticky like melting glass.
Therefore, I have to be extra patient but fast to pour the glass wax to the mould and put the inner layer inside. At the same time, I also need to be aware of making bubbles as the glass wax is a translucent material. If there is some bubble, it will be very obvious. I failed few times as I was too slow to put the wax to the mould. And it took me an hour more to melt them again… But eventually, I am really delighted that I can make the one I want at last for the show after different tests and failure! When the light shines on it, the result looks cool as well!